
This text is primarily concerned with principles of multimedia — the fundamentals to be grasped for a real understanding of this subject. Nonetheless, we need real vehicles for showing this understanding, and straight programming in C++ or Java is not always the best way of showing your knowledge. Most introductory multimedia courses ask you to at least start off delivering some multimedia product. So we need a jump – start to help you learn “yet another software tool.” This section aims to give you that jump-start.
Therefore, we’ll consider some popular authoring tools. Since the first step in creating a multimedia application is probably creation of interesting video clips, we start off looking at a video editing tool. This is not really an authoring tool, but video creation is so important that we include a small introduction to one such program.
The tools we look at are the following:
· Adobe Premiere 6
· Macromedia Director 8 and MX
· Flash 5 and MX
· Dreamweaver MX While this is not an exhaustive list, these tools are often used in creating multimedia content.
Adobe Premiere
Premiere Basics Adobe Premiere is a very simple video editing program that allows you to quickly create a simple digital video by assembling and merging multimedia components. It effectively uses the score authoring metaphor, in that components are placed in “tracks” horizontally, in a Timeline window.
The File New Project command opens a window that displays a series of “presets” —assemblies of values for frame resolution, compression method, and frame rate. There are many preset options, most of which conform to some NTSC or PAL video standard.
Start by importing resources, such as AVI (Audio Video Interleave) video files and WAV sound files and dragging them from the Project window onto tracks 1 or 2. (In fact, you can use up to 99 video and 99 audio tracks!)
Video 1 is actually made up of three tracks: Video 1A, Video IB and Transitions. Transitions can be applied only to Video 1. Transitions are dragged into the Transitions track from the Transition window, such as a gradual replacement of Video 1A by Video IB (a dissolve), sudden replacement of random pixels in a checkerboard (a dither dissolve), or a wipe, with one video sliding over another. There are many transitions to choose from, but you can also design an original transition, using Premiere’s Transition Factory.
You can import WAV sound files by dragging them to Audio 1 or Audio 2 of the Timeline window or to any additional sound tracks. You can edit the properties of any sound track by right – clicking on it.
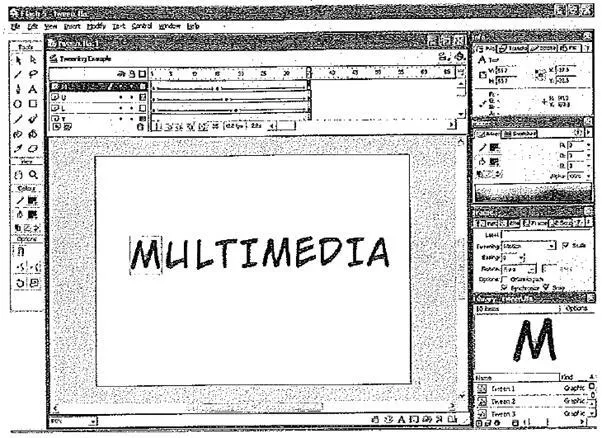
Adobe Premiere screen
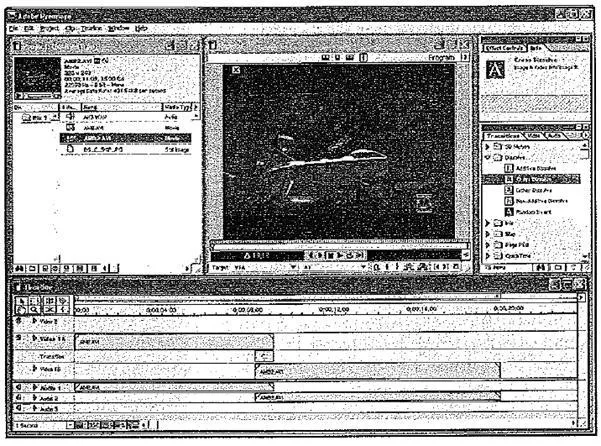
The above figure shows what a typical Premiere screen might look like. The yellow ruler at the top of the Timeline window delineates the working timeline — drag it to the right amount of time. The 1 Second dropdown box at the bottom represents showing one video keyframe per 1 second.
To “compile” the video, go to Timeline > Render Work Area and save the project as a .ppj file. Now it gets interesting, because you must make some choices here, involving how and in what format the movie is to be saved. The following figure shows the project options. The dialogs that tweak each codec are provided by the codec manufacturer; bring these up by clicking on the Configure button. Compression codecs (compression – decompression protocols) are often in hardware on the video capture card. If you choose a codec that requires hardware assistance, someone else’s system may not be able to play your brilliant digital video, and all is in vain!
Images can also be inserted into tracks. We can use transitions to make the images gradually appear or disappear in the final video window. To do so, set up a “mask” image. Here, we have imported an Adobe Photoshop 6.0 layered image, with accompanying alpha channel made in Photoshop.
Then in Premiere, we click on the image, which has been placed in its own video track, and use Clip > Video Options > Transparency to set the Key (which triggers transparency) to Alpha Channel. It is also simple to use Clip > Video Options > Motion to have the image fly in and out of the frame.
(a) output options; (b) compression options
In Photoshop, we set up an alpha channel as follows:
· Use an image you like — a. JPG, say.
· Make the background some solid color — white, say.
· Make sure you have chosen Image > Mode > RGB Color.
· Select that background area (you want it to remain opaque in Premiere) – use the magic wand tool.
· Go to Select > Save Selection….
· Ensure that Channel = New. Press OK.
RGB channels, (b): Alpha channel
· Go to Window > Show Channels, double – click the new channel, and rename it Alpha; make its color (0, 0, 0).
· Save the file as a PSD.
If the alpha channel you created in Photoshop has a white background, you’ll need to choose Reverse Key in Premiere when you choose Alpha. Premiere has its own simple method of creating titles (to give credit where credit is due) for your digital video.
Another nice feature of Premiere is that it is simple to use in capturing video. To form a digital video from a videotape or camcorder input, go to File > Capture > Movie Capture. (The menu for video / audio capture options appears by right – clicking the capture window.) Similarly, saving to analog tape format is also simple.
Premiere Transitions Premiere offers an interesting assortment of video transitions. However, examining the resulting video frame by frame reveals that the built – in transitions do not work quite as “advertised”. For example, on close examination, what purports to be a wipe that is linear with time turns out to have a nonlinear dip as it begins — the video transition line moves at not quite constant speed.
The Premiere Transition Factory provides a good many functions for building our own transitions, if we are interested in doing so. Since we are actually in an int regime, these functions, such as sin and cos, have both domain and range in the ints rather than floats. Therefore, some care is required in using them.
Macromedia Director
Director Windows. Director is a complete environment for creating interactive “movies”. The movie metaphor is used throughout Director, and the windows
Director: main windows
used in the program reflect this. The main window, on which the action takes place, is the Stage. Explicitly opening the Stage automatically closes the other windows. (A useful shortcut is Shift + Keypad – Enter (the Enter key next to the numeric keypad, not the usual Enter key); this clears all windows except the Stage and plays the movie.)
The other two main windows are Cast and Score. A Cast consists of resources a movie may use, such as bitmaps, sounds, vector – graphics shapes, Flash movies, digital videos, and scripts. Cast members can be created directly or simply imported. Typically you create several casts, to better organize the parts of a movie. Cast members are placed on the Stage by dragging them there from the Cast window. Because several instances may be used for a single cast member, each instance is called a sprite. Typically, cast members are raw media, whereas sprites are objects that control where, when, and how cast members appear on the stage and in the movie.
Sprites can become interactive by attaching “behaviors” to them (for example, make the sprite follow the mouse) either prewritten or specially created. Behaviors are in the internal script language of Director, called Lingo. Director is a standard event – driven program that allows easy positioning of objects and attachment of event procedures to objects.
The set of predefined events is rich and includes mouse events as well as network events (an example of the latter would be testing whether cast members are downloaded yet). The type of control achievable might be to loop part of a presentation until a video is downloaded, then continue or jump to another frame. Bitmaps are used for buttons, and the most typical use would be to jump to a frame in the movie after a button – click event.
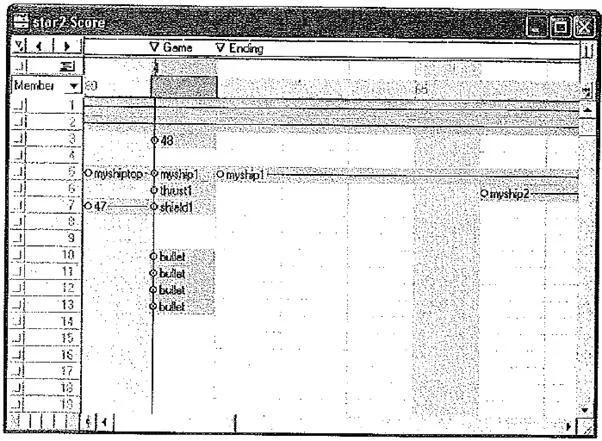
The Score window is organized in horizontal lines, each for one of the sprites, and vertical frames. Thus the Score looks somewhat like a musical score, in that time is from left to right, but it more resembles the list of events in a MIDI file.
Both types of behaviors, prewritten and user – defined, are in Lingo. The Library palette provides access to all prewritten behavior scripts. You can drop a behavior onto a sprite or attach behaviors to a whole frame.
A tweened sprite
If a behavior includes parameters, a dialog box appears. For example, navigation behaviors must have a specified frame to jump to. You can attach the same behavior to many sprites or frames and use different parameters for each instance. Most behaviors respond to simple events, such as a click on a sprite or the event triggered when the “playback head” enters a frame. Most basic functions, such as playing a sound, come prepackaged. Writing your own user – defined Lingo scripts provides more flexibility. Behaviors are modified using Inspector windows: the Behavior Inspector, or Property Inspector.
Animation Traditional animation (eel animation) is created by showing slightly different images over time. In Director, this approach amounts to using different cast members in different frames. To control this process more easily, Director permits combining many cast members into a single sprite. (To place on the score, select all the images to be combined, then use the Cast To Time menu item to place them in the current score location.) A useful feature is that expanding the time used on the score for such an animation slows the playback time for each image, so the whole animation takes the required amount of time.
A less sophisticated – looking but simple animation is available with the tweening feature of Director. Here, you specify a particular image and move it around the stage without altering the original image. “Tweening” refers to the job of minor animators, who used to have to fill in between the keyframes produced by more experienced animators — a role Director fulfills automatically, To prepare such an animation, specify the path on the stage for the tweened frames to take. You can also specify several keyframes and the kind of curve for the animation to follow between keyframes. You also specify how the image should accelerate and decelerate at the beginning and end of the movement (“ease – in” and “ease-out”).
A simple kind of animation called palette animation is also widely used. If images are 8-bit, cycling through the color lookup table or systematically replacing lookup table entries produces interesting (or strange) effects.
The Score window’s important features are channels, frames, and the playback head. The latter shows where we are in the score; clicking anywhere in the score repositions the playback head. Channels are the rows in the Score and can contain sprite instances of visible media. Therefore, these numbered channels are called Sprite channels. .
At the top of the Score window are Special Effects channels for controlling the palettes, tempo, transitions, and sounds. Frames are numbered horizontally in the Sprite and Special Effects channels. A frame is a single step in the movie, as in a traditional film. The movie’s playback speed can be modified by resetting the number of frames per second.
Score window
Control You can place named markers at any frame. Then the simplest type of control event would be to jump to a marker. In Director parlance, each marker begins a Scene. Events triggered for frame navigation are Go To Frame, Go To Marker, or Hold on Current Frame, which stops the movie at that frame. Behaviors for frames appear in a Script Channel in the score window.
Buttons are simply bitmaps with behaviors attached. You usually make use of two bitmaps, one depicting the depressed state of the button and one for the undepressed state. Then the built – in event on mouseup effects the jump.
Lingo Lingo is embedded into Adobe Director. Lingo is an object – oriented programming (OOP) language.
There are 3 types of scripts in Lingo:
· behavior scripts are attached to a sprite or inserted into a frame. Sprite behaviors are often used to give control of the sprite’s properties and movement. Frame behaviors can be used to create a pause or delay within a certain frame in the score. Behaviors make it easy to program in an object – oriented way, as you can directly see the relationship between the programming and the item they are attached to. They can also control or interact with other sprites, making them a true object.
· movie scripts are not attached to sprites nor can they be instantiated as Objects. They are available throughout the program (movie) and are especially useful for holding global handlers and initializing global variables at the start or end of the movie.
· parent scripts are used to “birth” (create instances of) an Object into a Variable using the “new” command. These objects can control sprites and other media remotely, without being attached to any one sprite, may be used to control data or other non – displayed items, and are useful for recursion routines such as path finding. A Parent script can be used to create or destroy an object at anytime, freeing them from the confines of the score that a Behavior is limited to.
Behavior and parent scripts encourage good object – oriented programming. Movie scripts are not as OOP – oriented; however, they can still be used to make “black – box” handlers, where other objects can input raw data and receive answers back, without knowing the inner workings of the box. Using the strengths and ease – of – use of Director’s programming methodology, with the advantages of OOP makes for a powerful and fast programming environment.
Lingo supports object inheritance by a slightly idiosyncratic system: a script can have an ancestor property which references another object (usually also a script, although other objects such as cast members can also be ancestors). Properties and methods of the ancestor are inherited by the parent. Behavior scripts are also a kind of ancestor of the sprites to which they are attached, since properties and methods of the behavior can be accessed by reference to the sprite itself. In this case, we have a kind of multiple inheritance, as one sprite may have several behaviors.
Lingo Movie – in – a – Window For an excellent example of lingo usage, the Lingo Help article on creating a movie – in – a – window shows a good overview of how to attach a script. Lingo is a standard, event-driven programming language. Event handlers are attached to specific events, such as a mouseDown message. Scripts contain event handlers. You attach a set of event handlers to an object by attaching the script to the object.
3D Sprites A new feature recently added to Director is the ability to create, import, and manipulate 3D objects on the stage. A simple 3D object that can be added in Director is 3D text. To create 3D text, select any regular text, then in the Property Inspector click on the Text tab and set the display mode to 3D. Other options, such as text depth and texture, can be changed from the 3D Extruder tab in the Property Inspector window. These properties can also “be dynamically set in Lingo as well, to change the text as the movie progresses.
3D objects other than text can be formed only using Lingo or imported from 3D Studio Max. Director supports many basic elements of 3D animation, including basic shapes such as spheres and user – definable meshes. The basic shapes can have textures and shaders added to them; textures are 2D images drawn onto the 3D models, while shaders define how the basic model looks. Lights can also be added to the scene; by default, one light provides ambient lighting to the whole scene. Four types of lights can be added: ambient, directional, point, and a spotlight. The strength and color of the light can also be specified.
The viewpoint of the user, called the camera, can be moved around to show the 3D objects from any angle. Movement of the camera, such as panning and tilting, can be controlled using built – in scripts in the Library window.
erties and Parameters Lingo behaviors can be created with more flexibility by specifying behavior parameters. Parameters can change a behavior by supplying input to the behavior when it is created. If no parameters are specified, a default value will be used. Parameters can be easily changed for a particular behavior by double – clicking on the name of the behavior while it is attached to another cast member, with dialog – driven parameter change as shown in the following figure.
A behavior can have a special handler called get Property Description List that is run when a sprite attached to the behavior is created. The handler returns a list of parameters that can be added by the addProp function. For example, if a movement behavior is made in Lingo, parameters can be added to specify the direction and speed of the movement. The behavior can then be attached to many cast members for a variety of movements.
The parameters defined in the get Property Description List handler are properties of the behavior that can be accessed within any handle of that behavior. Defining a property in a behavior can be done by simply using the property keyword outside any handler and listing all the properties, separated by commas. Global variables can be accessed across behaviors; they can be declared like a property, except that the global keyword is used instead. Each behavior that needs to access a global variable must declare it with the global keyword.
Parameters dialog box
Director Objects
Basically, objects are logical groupings of named data that also can contain methods that act on that data. In this release of Director, the scripting APIs have been grouped into objects and are accessed through these objects. Each object provides access to a specific set of named data and type of functionality. For example, the Sprite object provides access to the data and functionality of a sprite, the Movie object provides access to the data and functionality of a movie, and so on
The objects used in Director fall into four categories — core objects, media types, scripting objects, and 3D objects. Depending on the type of functionality you want to add and the part of a movie you are adding functionality to, you will use the objects from one or more of these categories.
Macromedia Flash
Adobe Flash (formerly Macromedia Flash) is a multimedia platform used to add animation, video, and interactivity to web pages. Flash is frequently used for advertisements, games and flash animations for broadcast. More recently, it has been positioned as a tool for “Rich Internet Applications” (“RIAs”). Flash manipulates vector and raster graphics to provide animation of text, drawings, and still images. It supports bidirectional streaming of audio and video, and it can capture user input via mouse, keyboard, microphone, and camera. Flash contains an object – oriented language called ActionScript and supports automation via the JavaScript Flash language (JSFL).
Flash content may be displayed on various computer systems and devices, using Adobe Flash Player, which is available free of charge for common web browsers, some mobile phones, and a few other electronic devices (using Flash Lite).
Some users feel that Flash enriches their web experience, while others find the extensive use of Flash animation, particularly in advertising, intrusive and annoying. Flash has also been criticized for adversely affecting the usability of web pages.
Library Window The Library window shows all the current symbols in the scene and can be toggled by the Window > Library command. A symbol can be edited by double – clicking its name in the library, which causes it to appear on the stage. Symbols can also be added to a scene by simply dragging the symbol from the Library onto the stage.
Timeline Window The timeline is one of the most important toolbars in Flash. On a timeline you have frames and keyframes. A frame is simply an intermediary between keyframes, there is no change in the amount of objects on the stage during a normal frame. Keyframes are major changes in the state of the stage. You use them to add a new object or end / begin an animation.
Keyframes are marked by small squares with a black dot in them. Blank keyframes are marked by a square with an empty dot. You can insert a frame with F5, a blank keyframe with F7, and a non – blank keyframe with F6. (You can also insert frames and keyframes from the contextual menu, which can be accessed by right – clicking on the timeline.)
All commands to insert and delete keyframes are available by right clicking (Mac: Control Click) on any frame of the timeline.
On a timeline there are layers. A layer can contain only 1 animation at a time, so therefore to animate multiple objects you need to use multiple layers to do multiple animations. Any layer above another layer will have the layers contents stacked above the lower layer.
Tools Window The Tools window, which allows the creation and manipulation of images, is composed of four main sections: Tools, View, Colors, and Options. Tools consists of selection tools that can be used to demarcate existing images, along with several simple drawing tools, such as the pencil and paint bucket. View consists of a zoom tool and a hand tool, which allow navigation on the Stage. Colors allows foreground and background colors to be chosen, and symbol colors to be manipulated. Options allows additional options when a tool is selected.
Many other windows are useful in manipulating symbols. With the exception of the Timeline window, which can be toggled with the View > Timeline command, all other windows can be toggled under the Window menu. The following figure shows the basic Flash screen.
Symbols Symbols can be either be composed from other symbols, drawn, or imported into Flash. Flash is able to import several audio, image, and video formats into the symbol library. A symbol can be imported by using the command File > Import, which automatically adds it to the current library. To create a new symbol for the movie, press Ctrl + F8. A pop – up dialog box will appear in which you can specify the name and behavior of the symbol. Symbols can take on one of three behaviors: a button, a graphic, or a movie. Symbols, such as a button, can be drawn using the Tools window.
Macromedia Flash
Buttons To create a simple button, create a new symbol with the button behavior. The Timeline window should have four keyframes: up, down, over, and hit. These keyframes show different images of the button when the specified action is taken. Only the up keyframe is required and is the default; all others are optional. A button can be drawn by selecting the rectangulai” tool in the Tools window and then dragging a rectangle onto the Stage.
To add images, so that the button’s appearance will change when an event is triggered, click on the appropriate keyframe and create the button image. After at least one keyframe is defined, the basic button is complete, although no action is yet attached to it. Actions are discussed further in the action scripts section below.
Creating a symbol from other symbols is similar to creating a scene: drag the desired symbols from the Library onto the Stage. This allows the creation of complex symbols by combining simpler symbols. The following figure shows a dialog box for symbol creation.
Animation in Flash Animation can be accomplished by creating subtle differences in each keyframe of a symbol. In the first keyframe, the symbol to be animated can be dragged onto the stage frorri the Library. Then another keyframe can be inserted, and the symbol changed. This can be repeated as often as needed. Although this process is time – consuming, it offers more flexibility than any other technique for animation. Flash also allows specific animations to be more easily created in several other ways. Tweening can produce simple animations, with changes automatically created between keyframes.
Create symbol dialog
Tweening There are two types of tweening: shape and movement tweening. Shape tweening allows you to create a shape that continuously changes to a different shape over time. Movement tweening allows you to place a symbol in different places on the Stage in different keyframes. Flash automatically fills in the keyframes along a path between the start and finish. To carry out movement tweening, select the symbol to be tweened, choose Insert > Create Motion TVeen, and select the endframe. Then use the command Insert > Frame and move the symbol to the desired position. More advanced tweening allows control of the path as well as of acceleration. Movement and shape tweenings can be combined for additional effect.
Mask animation involves the manipulation of a layer mask — a layer that selectively hides portions of another layer. For example, to create an explosion effect, you could use a mask to cover all but the center of the explosion. Shape tweening could then expand the mask, so that eventually the whole explosion is seen to take place. The following figure shows a scene before and after a tweening effect is added.
Action Scripts Action scripts allow you to trigger events such as moving to a different keyframe or requiring the movie to stop. Action scripts can be attached to a keyframe or symbols in a keyframe. Right – clicking on the symbol and pressing Actions in the list can modify the actions of a symbol. Similarly, by right – clicking on the keyframe and pressing Actions in the pop – up, you can apply actions to a keyframe. A Frame Actions window will come up, with a list of available actions on the left and the current actions being applied symbol on the right. Action scripts are broken into six categories: Basic Actions, Actions, Operators, Functions, Properties, and Objects.
Basic Actions allow you to attach many simple actions to the movie. Some common actions are
Action scripts window
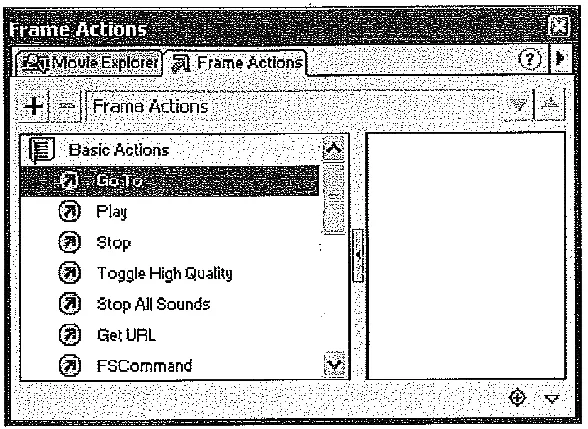
· Goto. Moves the movie to the keyframe specified and can optionally stop. The stop action is commonly used to stop interactive movies when the user is given an option.
· Play. Resumes the movie if the movie is stopped.
· Stop. Stops the movie if it is playing.
· Tell Target. Sends messages to different symbols and keyframes in Flash. It is commonly used to start or stop an action on a different symbol or keyframe.
The Actions category contains many programming constructs, such as Loops and Go to statements. Other actions are also included, similar to those in typical high – level, event – driven programming languages, such as Visual Basic. The Operators category includes many comparison and assignment operators for variables. This allows you to perform operations on variables in the action script.
The Functions category contains built – in functions included in Flash that are not specific to a Flash object. The Properties section includes all the global variables predefined in Flash. For example, to refer to the current frame, the variable .current frame is defined. The Objects section lists all objects, such as movie clips or strings and their associated functions.
Buttons need action scripts — event procedures — so that pressing the button will cause an effect. It is straight forward to attach a simple action, such as replaying the Flash movie, to a button. Select the button and click to launch the action script window, located at the bottom right of the screen. Then click on Basic Actions, which generates a drop – down list of actions. Double – clicking on the Play action automatically adds it to the right side of the window. This button now replays the movie when clicked.
Dreamweaver
Dreamweaver is quite a popular Macromedia product (Dreamweaver MX is the current version) for building multimedia – enabled web sites as well as Internet applications in HTML, XML, and other formats. It provides visual layout tools and code – editing capability for file types such as JavaScript, Active Server Pages, PHP, and XML. The product is integrated with other Macromedia products such as Flash MX and Fireworks MX.
Along with its use as basically a WYSIWYG web development tool, an interesting part of Dreamweaver that relates more directly to authoring is the fact that it comes with a prepackaged set of behaviors and is also extensible. The behaviors are essentially event procedures, responding to events such as mouseover — the set of possible events is different for each target browser and is reconfigurable for each browser and version number. Computer Science students can write their own Javascript code, say, and attach this to events.

Comments are closed