The simplest calibration procedure for a linear instrument is the so-called zero-and-span method.
· The method is as follows:
1. Apply the lower-range value stimulus to the instrument, wait for it to stabilize
2. Move the \zero” adjustment until the instrument registers accurately at this point
3. Apply the upper-range value stimulus to the instrument, wait for it to stabilize
4. Move the \span” adjustment until the instrument registers accurately at this point
5. Repeat steps 1 through 4 as necessary to achieve good accuracy at both ends of the range
An improvement over this crude procedure is to check the instrument’s response at several points between the lower- and upper-range values. A common example of this is the so-called -ve-point calibration where the instrument is checked at 0% (LRV), 25%, 50%, 75%, and 100% (URV) of range. A variation on this theme is to check at the -ve points of 10%, 25%, 50%, 75%, and 90%, while still making zero and span adjustments at 0% and 100%. Regardless of the specific percentage points chosen for checking, the goal is to ensure that minimum accuracy is maintained at all points along the scale, so that the instrument’s response may be trusted when placed into service.
Yet another improvement over the basic -ve-point test is to check the instrument’s response at -ve calibration points decreasing as well as increasing. Such tests are often referred to as Updown calibrations. The purpose of such a test is to determine if the instrument has any significant hysteresis: a lack of responsiveness to a change in direction.
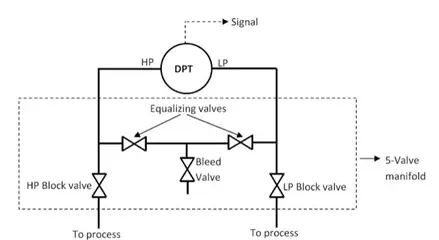
Now we will discuss how to calibrate a typical 5 Valve Manifold Pressure Transmitter. 5-Valve Manifold is shown below:

During normal operation, HP and LP valves are open, and equalizing valve and bleed ales are closed. Now adopt following sequence to start the calibration.
1. Check or Close all the valves.
2. Open the equalizing valves. This would apply same pressure to both the sides of the manifold.
3. Open the bleed valves to vent process pressure to the atmosphere.
4. Close the Bleed valve
5. Apply the dead weight tester/ Calibrator to the HP and LP side
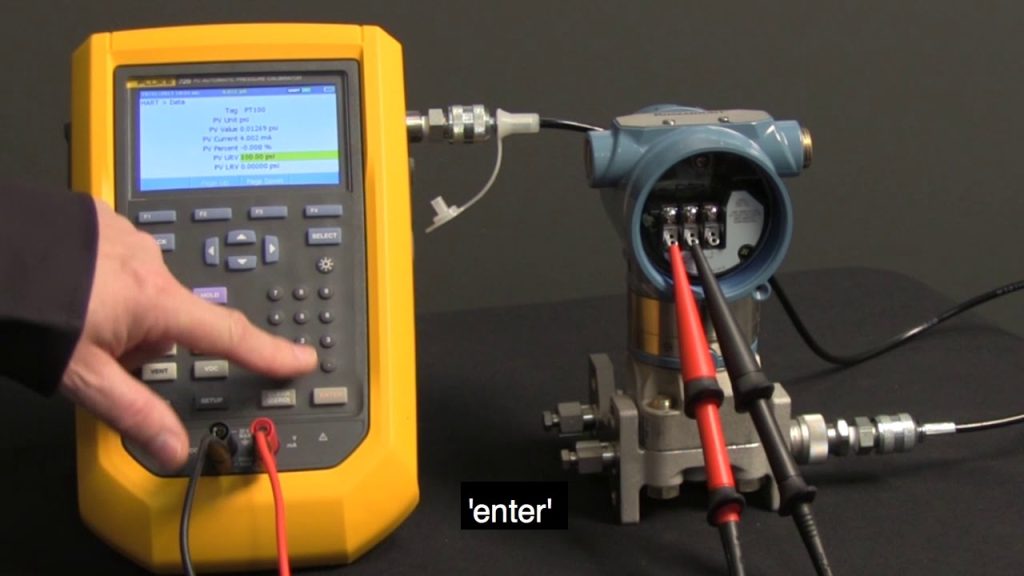
6. Using HART calibrator adjust the zero span at 0 pressure and then for the maximum pressure.
The calibration of inherently nonlinear instruments is much more challenging than for linear instruments. No longer are two adjustments (zero and span) sufficient, because more than two points are necessary to define a curve. Examples of nonlinear instruments include expanded-scale electrical meters, square root characterizers, and position-characterized control valves. Every nonlinear instrument will have its own recommended calibration procedure, so I will defer you to the manufacturer’s literature for your specific instrument. I will, however, give one piece of advice. When calibrating a nonlinear instrument, document all the adjustments you make (e.g. how many turns on each calibration screw) just in case you find the need to \re-set” the instrument back to its original condition. More than once I have struggled to calibrate a nonlinear instrument only to find myself further away from good calibration than where I originally started. In times like these, it is good to know you can always reverse your steps and start over!
An important principle in calibration practice is to document every instrument’s calibration as it was found and as it was left after adjustments were made. The purpose for documenting both conditions is so that data is available to calculate instrument drift over time. If only one of these conditions is documented during each calibration event, it will be difficult to determine how well an instrument is holding its calibration over long periods of time. Excessive drift is often an indicator of impending failure, which is vital for any program of predictive maintenance or quality control.
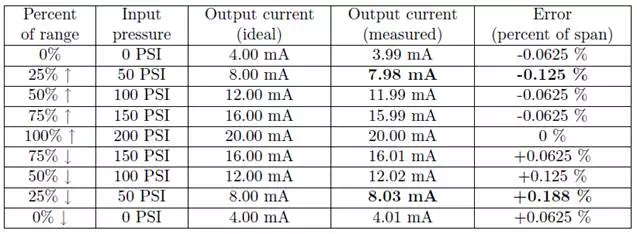
It is not uncommon for calibration tables to show multiple calibration points going up as well as going down, for the purpose of documenting hysteresis and deadband errors. Note the following example, showing a transmitter with a maximum hysteresis of 0.313 % (the o®ending data points are shown in bold-faced type):

In the course of performing such a directional calibration test, it is important not to overshoot any of the test points. If you do happen to overshoot a test point in setting up one of the input conditions for the instrument, simply \back up” the test stimulus and re-approach the test point from the same direction as before. Unless each test point’s value is approached from the proper direction, the data cannot be used to determine hysteresis/deadband error.
NIST traceability
As said previously, calibration means the comparison and adjustment (if necessary) of an instrument’s response to a stimulus of precisely known quantity, to ensure operational accuracy. In order to perform a calibration, one must be reasonably sure that the physical quantity used to stimulate the instrument is accurate in itself. For example, if I try calibrating a pressure gauge to read accurately at an applied pressure of 200 PSI, I must be reasonably sure that the pressure I am using to stimulate the gauge is actually 200 PSI. If it is not 200 PSI, then all I am doing is adjusting the pressure gauge to register 200 PSI when in fact it is sensing something different. Ultimately, this is a philosophical question of epistemology: how do we know what is true?
There are no easy answers here, but teams of scientists and engineers known as metrologists devote their professional lives to the study of calibration standards to ensure we have access to the best approximation of \truth” for our calibration purposes. Metrology is the science of measurement, and the central repository of expertise on this science within the United States of America is the National Institute of Standards and Technology, or the NIST (formerly known as the National Bureau of Standards, or NBS). Experts at the NIST work to ensure we have means of tracing measurement accuracy back to intrinsic standards, which are quantities inherently ¯xed (as far as anyone knows). The vibrational frequency of an isolated cesium atom when stimulated by radio energy, for example, is an intrinsic standard used for the measurement of time (forming the basis of the so-called atomic clock). So far as anyone knows, this frequency is fixed in nature and cannot vary. Intrinsic standards therefore serve as absolute references which we may calibrate certain instruments against.


